Friday, November 11, 2011

BlackBerry 9300 display problem

Fault description:
Blackberry 9300 sometime had a strange problem that we can’t see display light on LCD. This problem occurs due to problem in LCD or sometime in LCD IC and track missing from display transistor to LCD connector. 

Fault solution:
For this problem we have to use hardware methods for quick solution. So apply these steps one by one:
1.       First change new lcd an then check light
2.       If no solution then we have to use hardware technique as step 3
3.       Open mobile PCB and check line continuity from LCD connector second point to display transistor IC as shown with yellow line in image below. If line missing there then apply jumper shown below:


4.       After this check line from first point of LCD connector to resistance as shown in image with red line and if line missing there then apply jumper as shown in image in red line. 

After applying both jumpers we will see proper display light on LCD without any problem.
  
Conclusion:
During new LCD change process we should use new and original LCD because local LCD can cause bad result in light.

Thursday, November 10, 2011

BlackBerry bold 9000 volume key problem

Fault description:
Blackberry bold 9000 sometime had a strange problem that both side volume key don’t work. So due to this we can’t increase or decrease sound in music and during call. This problem occurs due to problem in side switch or sometime in keypad resistance.

Fault solution:
For quick and proper solution for this error we have to follow all these steps carefully:
1.       First we should change both side volume key and check for solution
2.       After that check that weather appropriate voltage are appearing on volume key point. If voltage missing there then go to step 3
3.       Now we have to check line continuity from volume key point to some resistance point as shown in image below:


4.       First we should test that first point of volume key should be grounded as shown with black mark
5.       Then check second point continuity to key resistance as shown with sky blue mark in above image
6.       Check third point line continuity to a metal type point as shown with green mark
7.       Finally check last and fourth point line track to other resistance as shown in image with red line.

So if during any of these line track testing we found line missing then apply jumper there carefully our problem will solved.
  
Conclusion:
During these jumpers setting we should care that all jumper should be placed separately and they should not have any connection or touching otherwise we will get internally shorting in circuit board.

Thursday, October 20, 2011

Samsung S5230 charging indication doesn't show

Fault description:
Samsung S5230 mobile some time shows not charging indication on screen every time. Due to this we can’t charge mobile and battery just drains after few hours. This problem mainly occurs due to shorting in charging filter.

Fault solution:
For quick solution of this problem we have to use following solution:-
1.       In some cases due to batteries internally circuitry problem creates this situation that mobile shows auto charging so first we should change battery and check result.
2.       After this try to change charging connector
3.       After replacing new charging connector  check track line continuity from charging pin 1,2 to desired point as shown in image below and from 19,20 to ground 
4.       If on any point line missing then apply jumper from pin’s point to pcb point as shown image below:

Conclusion:

Samsung s5230 mobile have 20 point charging connector so during jumpering process we should short point 1and 2, 19 and 20 for proper result.

Wednesday, October 12, 2011

BlackBerry Pearl 3G9100: troubleshooting charging and usb error

Fault description:
BlackBerry mobile sometimes has a charging and usb connector problem. So we can't charge the mobile and also can't connect the usb to the PC due to this error. We had this problem due to a damaged charging connector or sometimes due to charging the IC.

Fault solution:
For a quick solution for this problem we have to follow all of these steps carefully:

1. First open the mobile and clean the charging connector. This process is very minor, but essential because the connector is very sensitive. It might not seem like a big thing, but the charging connector should always be clean. A few particles of dirt can make the difference between whether it serves its purpose or fails to work.

2. Then change the charging socket.

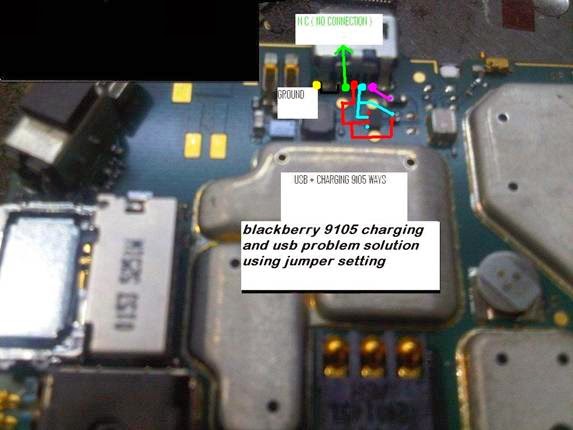
3. If the problem still remains then check all track continuity from the charging pin point to the appropriate transistor and on the IC point as shown in the image below.


4. According to the image first check the point 1 shown in green. The point should be ground.

5. Point 2 in the green mark should be blank with no connectivity.

6. Point 3 with the red point should be connected to charging IC leg number 2 using the red jumper line.

7. Point 4 with the sky blue mark should be connected to IC leg number 1 with the jumper and this point should be connected to the other charging transistor also shown in the image.

8. Last and final point 5 shown with the pink mark should connect to the other charging transistor below the charging pin.

After all of this is done, the jumper setting, mobile charging and making the usb connection the problem will definitely be solved.
  
Conclusion:
During the jumping process we should especially take care of all the nearest components of the circuit board and make sure that they do not become damaged. This is essential because any type of shorting in any component may cause another serious problem. The whole system relies upon the circuit board and if it goes down, then nothing is going to work.

The circuit board is a delicate thing; basically it is the heart of the mobile and any disruption whatsoever can throw it off. Also it is easy to break and difficult to repair. That is why you must be extremely careful when doing anything to it or near it. If something happens to the circuit board, you will have to purchase another mobile.

Tuesday, October 11, 2011

Motorola v9 mobile hardware flawed charger error

Fault description:
Motorola v9 mobile some time shows fake charging or shows charger error or invalid battery
This problem seems to be a hardware fault. In such case mobile battery can’t be charge with charger.

Fault solution:
 So for solving this problem we have to use following hardware tricks.
1.       Try to change battery and charger
2.       If no solution then open mobile pcb and use next step
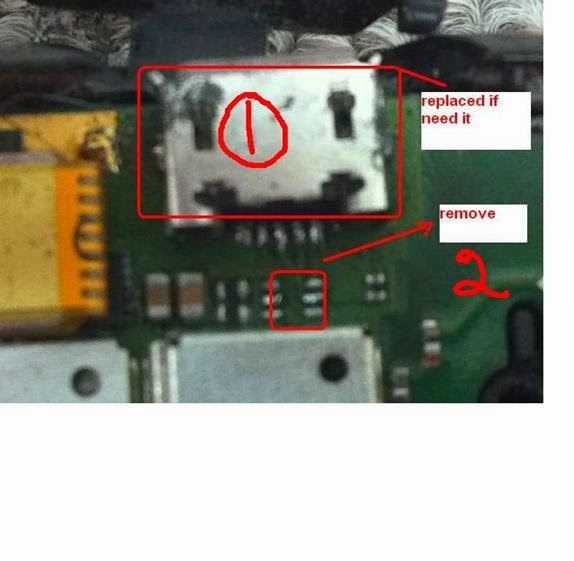
3.       Try to change charging pin connector as shown in image below
4.       After that if problem still appears then remove a six leg charging IC as shown in image below.


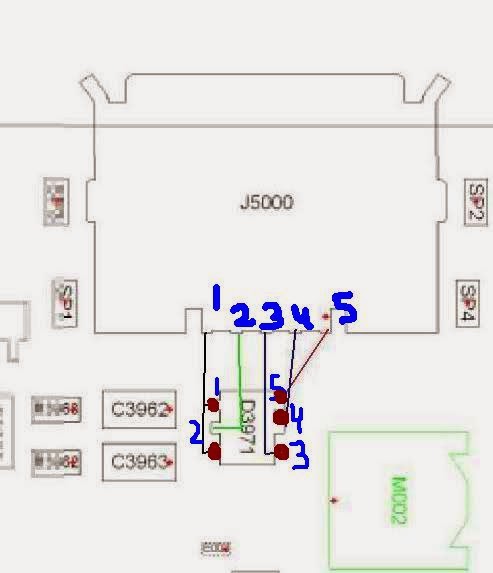
5.       After removing IC apply jumper from charging pin point to ICs all point as shown in image below.


6.       Here we show charging point as blue mark numbering and ICs point as red mark so connect all those carefully.  

Conclusion:
During new pin changing process we should properly connect app pin point to PCB point otherwise after all these process we will not get solution.

Saturday, September 24, 2011

LG GS290 mic trouble can't make calls or record voice messages

Fault description:
Due to some hardware reason LG GS290 mobile got mic trouble. This is a minor fault in LG mobile but due to this we can’t complete any call and also can’t record any voice message.   

Fault solution:
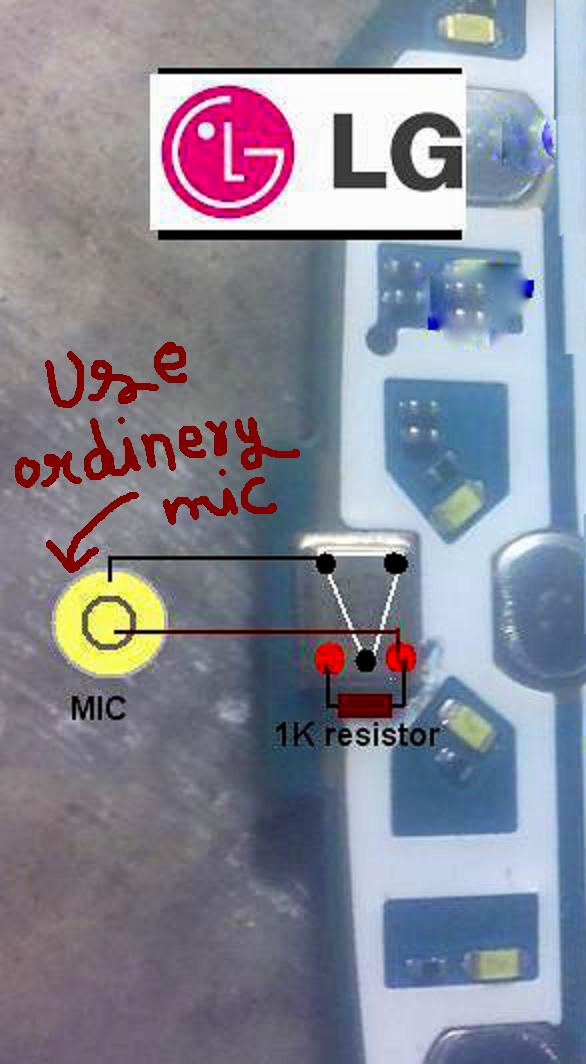
For this mic solution we have to change mic from five point mic to ordinary two leg universal mic using 1k resistor and two jumpers.
1.       First remove that default mic
2.       Then pick universal mic and connect first point to default mic’s first point as shown with black line in image below.


3.       Then connect second point of universal mic to fifth and last point of default mic with red line as shown in above image.
4.       Finally connect a 1k transistor as shown with red color between 3rd and 5th point of default mic.

Conclusion:
During these mic altering process we should use good quality universal mic because local mic may result in low voice or distribution in voice during call .

Friday, September 16, 2011

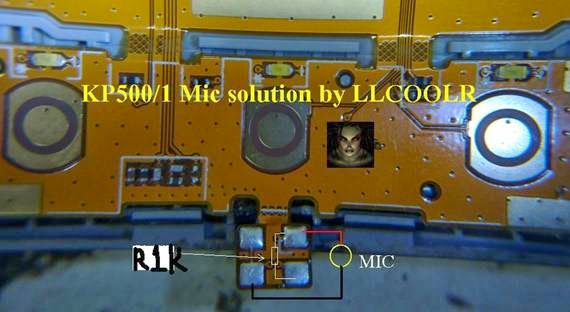
LGkp500 mic trouble no voice

Fault description:
In lg mobile sometime mic starts not responding during call so at callers end no voice generates. Due to this we can’t record voice in voice recorder and can’t make any call properly.

Fault solution:
For this mic solution we have to follow all these procedure step by step:
1.       First we should change new mic and then check for voice sound.
2.       Then clean both mic connectors positive and negative for proper voltage.
3.       If proper voltage appearing on point then use following jumpering solution as shown in image:


4.       During mic jumpering process we have to connect a 1k transistor between both positive and negative point
5.       After that connect mic with those point and that 1k transistor 
Now we will get our mic properly in working condition.

 Conclusion:
As previously described we have to use only 1k resistor exactly because using different current resistor can cause other problem like shorting in mic line track.

 
Design by Free WordPress Themes | Bloggerized by Lasantha - Premium Blogger Themes | Laundry Detergent Coupons